Clojure Stack TemplatesClojure Stack Templates

Tutorial

Let's build your first application with Clojure Stack Lite

Now that we've created a new project, we're ready to get started. Let's build a simple application together.

After Generating Your Project

The first recommended step is to check the code formatting, linting, tests, and outdated dependencies:

bb check

Next, let's initialize a git repository and commit the initial setup:

git init
git add .
git commit -am 'Initial commit'

Starting the Server

Navigate to your project root directory and start the REPL:

bb clj-repl

Once in the REPL, run the application system which includes the server, database, and TailwindCSS CLI components:

user=> (reset)

Tip

Check out a section on setting up development environment with code editors.

Modifying the Starter Page

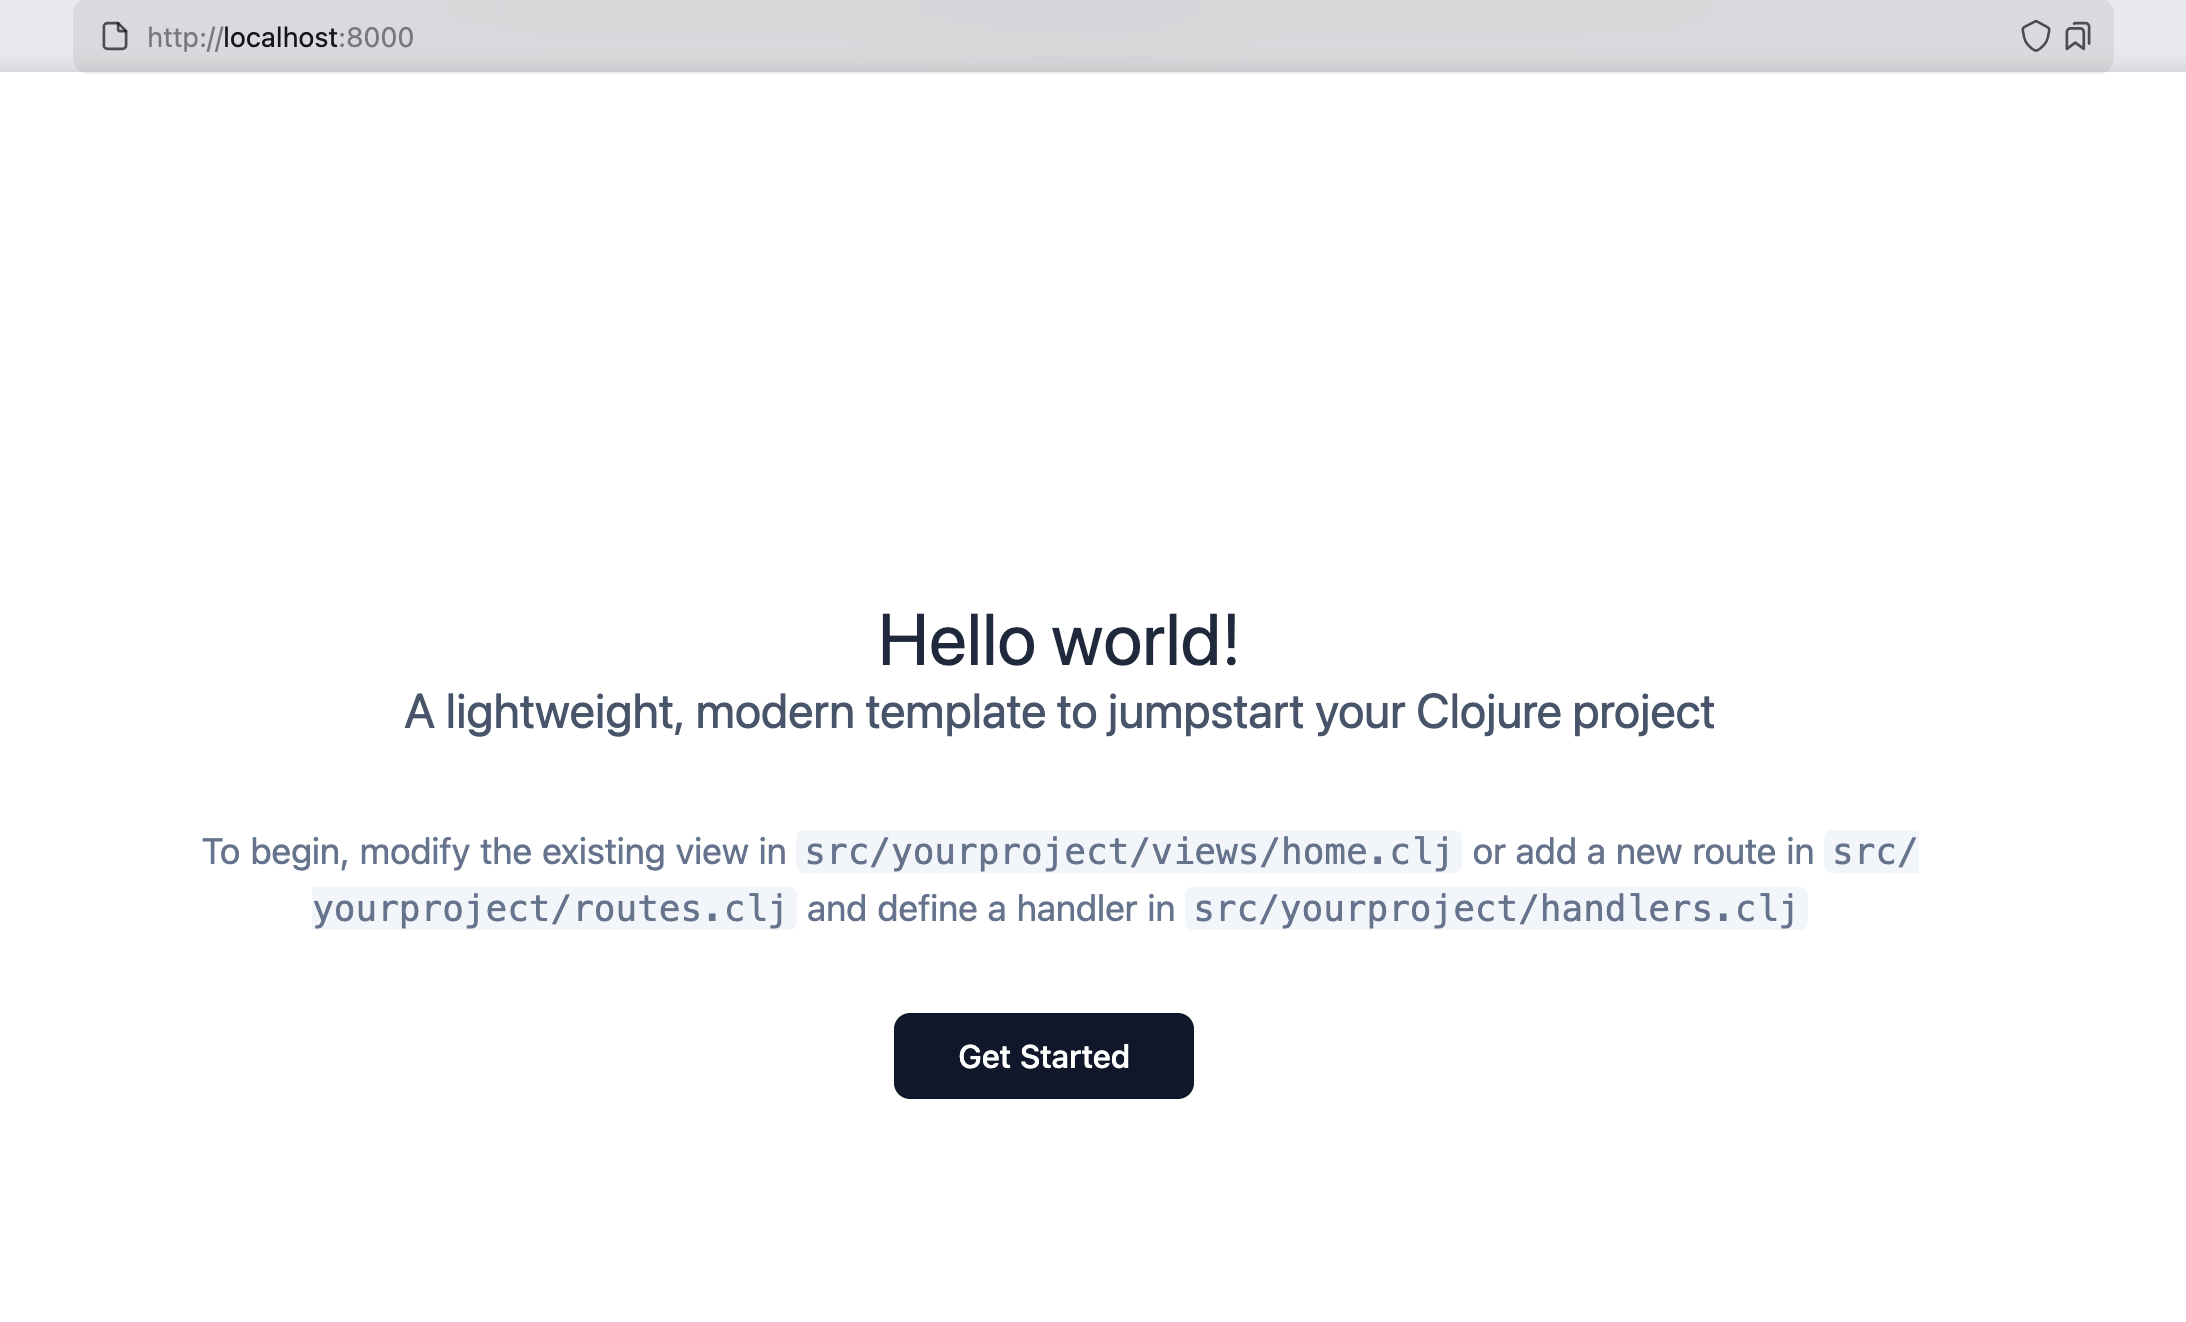
Let's make a simple change to the starter page to see how updates work. Open the src/myproject/views.clj file and replace the :h1 UI component at function home-page with [:h1 {:class ["text-5xl"]} "Hello world!"]. After reloading the page in your browser, you'll see that the title has been updated.

Clojure Stack Lite starter page

Application System Components

The entry point of the application in production environment is src/myproject/core.clj. It contains a main function that runs the system with the production profile. We use Integrant as a framework for managing all components of the system. The main config file where the entire system is described lives at resources/config.edn. The core components are db and server, which are defined in src/myproject/db.clj and src/myproject/server.clj respectively.

The default configuration of the server component is provided by the reitit-extras small helper library for convenience. It offers several options to extend the server configuration. If you need to customize or replace anything in the server configuration, you can copy the server definition from reitit-extras to your project.

In development mode, the entry point is dev/user.clj. Here we start the same system with the dev profile and an extension from resources/config.dev.edn that contains an additional component to run the tailwindcss CLI tool in watch mode. This automatically reloads CSS styles when files change. Since it's started as part of the application system, we don't need to run it separately.

Implementing Our Application

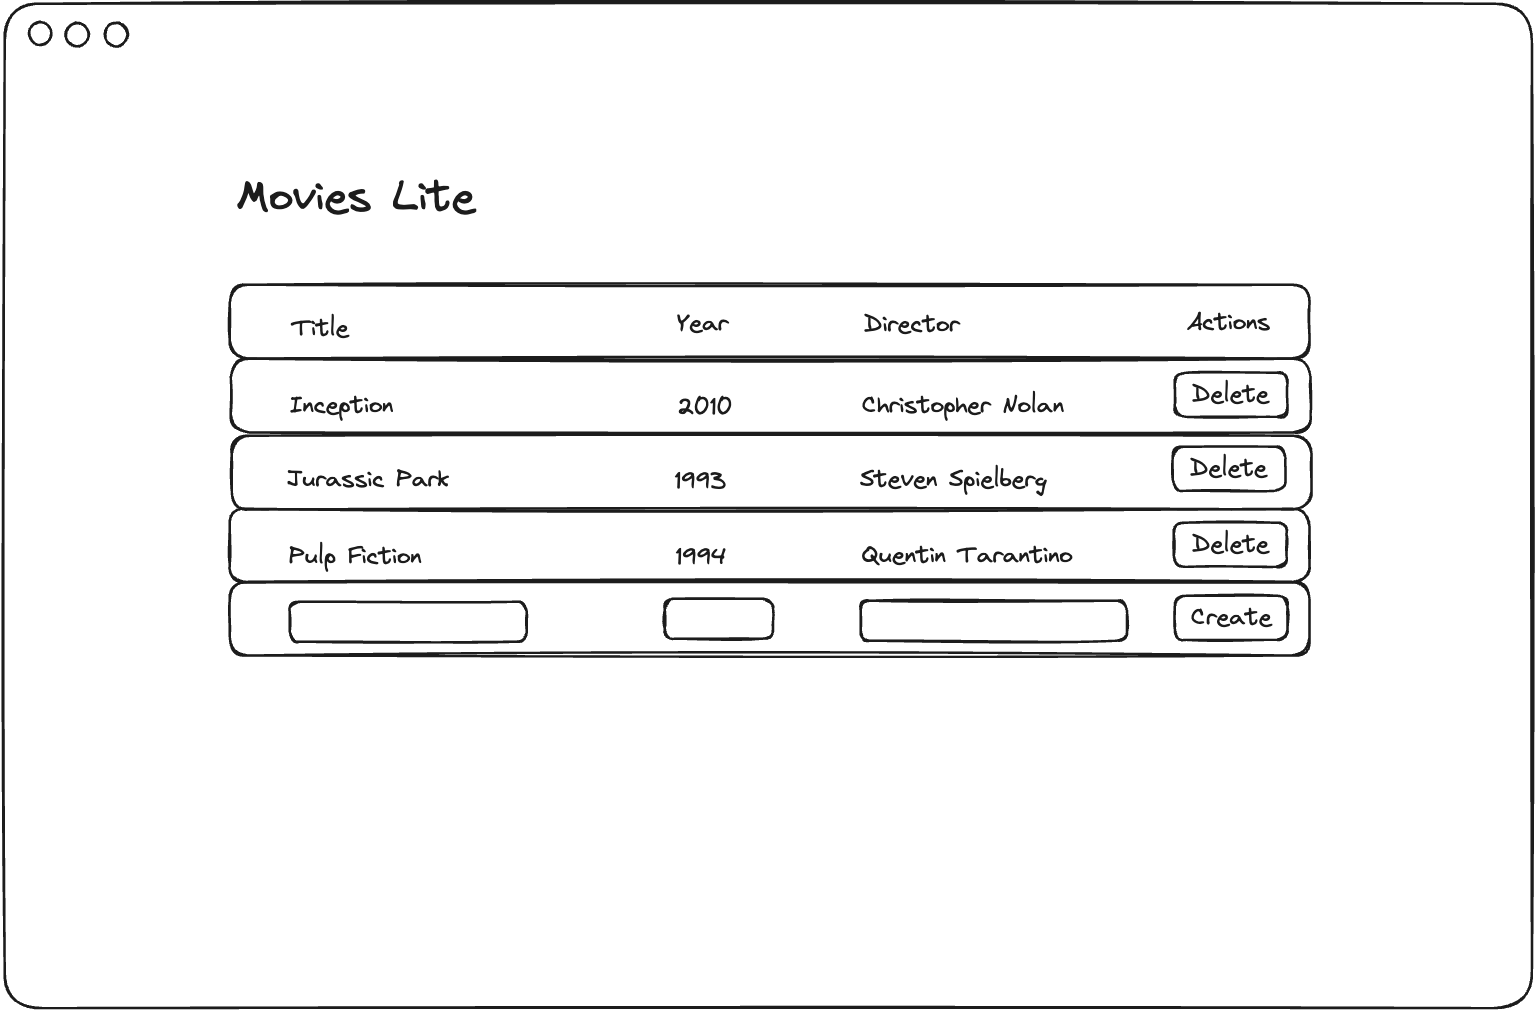
Now that everything is set up, we're ready to create our application. We'll build a movie list application called "Movies Lite". This application will allow users to add new movies, view the list of movies, and delete entries from the list.

Here's a mockup of the page we're going to build:

UI mockup

Database Structure

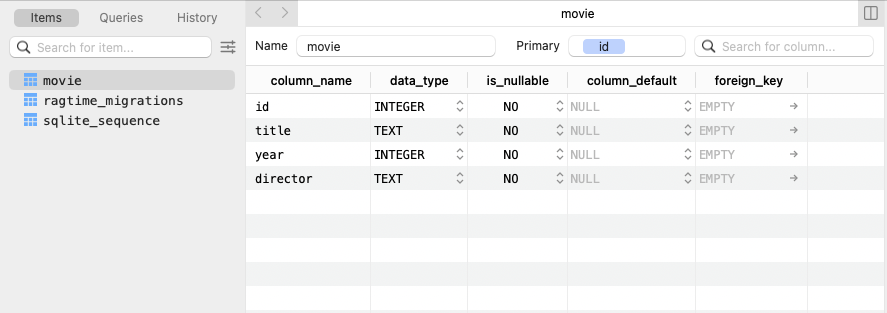
For simplicity, we'll create a single table called movie with the fields id, title, year, and director. To create this schema, add the following database migration by creating a new file resources/migrations/0002.up.sql with this content:

resources/migrations/0002.up.sql
CREATE TABLE movie (
    id INTEGER UNIQUE PRIMARY KEY AUTOINCREMENT NOT NULL,
    title TEXT NOT NULL,
    year INTEGER NOT NULL,
    director TEXT NOT NULL
);

Migrations are applied automatically when the system starts. To apply our new migration, run (reset) in the REPL. The database file will be created in the db directory of the project with the name myproject.sqlite. Afterward, you can connect to the database using any SQLite client (such as TablePlus) to verify that the movie table was created successfully:

Movies DB table

Application UI Layout

To visualize all parts of the application, let's create a UI layout for our main page. Let's examine src/myproject/views.clj. This namespace contains functions that convert data to Hiccup templates, which will be transformed into HTML during the response rendering process. The namespace includes a base function that provides the default setup for all pages, including the page title, static files, and a placeholder for any content we want to display.

According to our application mockup, the page features a title and a table listing movies. Each row has a "Delete" button in the last column. At the bottom of the table, there's a form for adding new movies.

Our home-page function and additional functions will look like:

src/myproject/views.clj
; ...
(defn list-item
  [{:keys [movie]}]
  [:tr
   [:td {:class ["px-6" "py-4" "text-gray-800"]} (:title movie)]
   [:td {:class ["px-6" "py-4" "text-gray-800"]} (:year movie)]
   [:td {:class ["px-6" "py-4" "text-gray-800"]} (:director movie)]
   [:td {:class ["px-6" "py-4"]}
    [:button
     {:class ["text-red-400" "hover:bg-gray-50" "bg-white" "border"
              "border-gray-300" "rounded-md" "px-3" "py-1" "cursor-pointer"]}
     "Delete"]]])
 
(defn form-input
  [{:keys [field-name field-type attrs]}]
  [:div
   {:class ["flex" "flex-col"]}
   [:input (merge {:class ["w-full" "border" "border-gray-300" "rounded-md" "px-3" "py-2"]
                   :type field-type
                   :name field-name
                   :placeholder (str "Enter " field-name)}
                  attrs)]])
 
(defn form
  []
  [:form
   {:id "form-create-movie"
    :class ["border-t" "border-gray-200" "bg-gray-50" "p-6"]}
   [:div {:class ["grid" "grid-cols-1" "md:grid-cols-4" "gap-4"]}
    (form-input {:field-name "title"
                 :field-type "text"})
    (form-input {:field-name "year"
                 :field-type "number"
                 :attrs {:min 1888}})
    (form-input {:field-name "director"
                 :field-type "text"})
    [:div {:class ["flex" "flex-col"]}
     [:button {:class ["bg-blue-600" "text-white" "rounded-md" "px-4" "py-2"
                       "hover:bg-blue-700" "cursor-pointer"]}
      "Create"]]]])
 
(defn home-page
  [{:keys [movies]}]
  (base
    [:div {:id "content"
           :class ["container" "mx-auto" "p-6" "max-w-4xl"]}
     [:div {:class ["mb-10" "flex" "justify-between" "items-center"]}
      [:h1 {:class ["text-2xl" "font-semibold" "text-gray-800"]} "Movies Lite"]]
     [:div {:class ["bg-white" "rounded-lg" "shadow-md" "overflow-hidden" "border"
                    "border-gray-200"]}
      [:div {:class ["overflow-x-auto"]}
       [:table {:class ["min-w-full" "divide-y" "divide-gray-200"]}
        [:thead {:class ["bg-white"]}
         [:tr
          [:th {:class ["px-6" "py-3" "text-left" "text-gray-500" "font-medium"]
                :scope "col"} "Title"]
          [:th {:class ["px-6" "py-3" "text-left" "text-gray-500" "font-medium"]
                :scope "col"} "Year"]
          [:th {:class ["px-6" "py-3" "text-left" "text-gray-500" "font-medium"]
                :scope "col"} "Director"]
          [:th {:class ["px-6" "py-3" "text-left" "text-gray-500" "font-medium"]
                :scope "col"} "Actions"]]]
        [:tbody {:id "table-content"
                 :class ["bg-white" "divide-y" "divide-gray-200"]}
         (for [movie movies]
           (list-item {:movie movie}))]]]
      (form)]]))

We've separated the list item, form, and form inputs into individual components for better organization and reusability. This approach will be particularly helpful when we need to render these components separately for newly created movies in the next section.

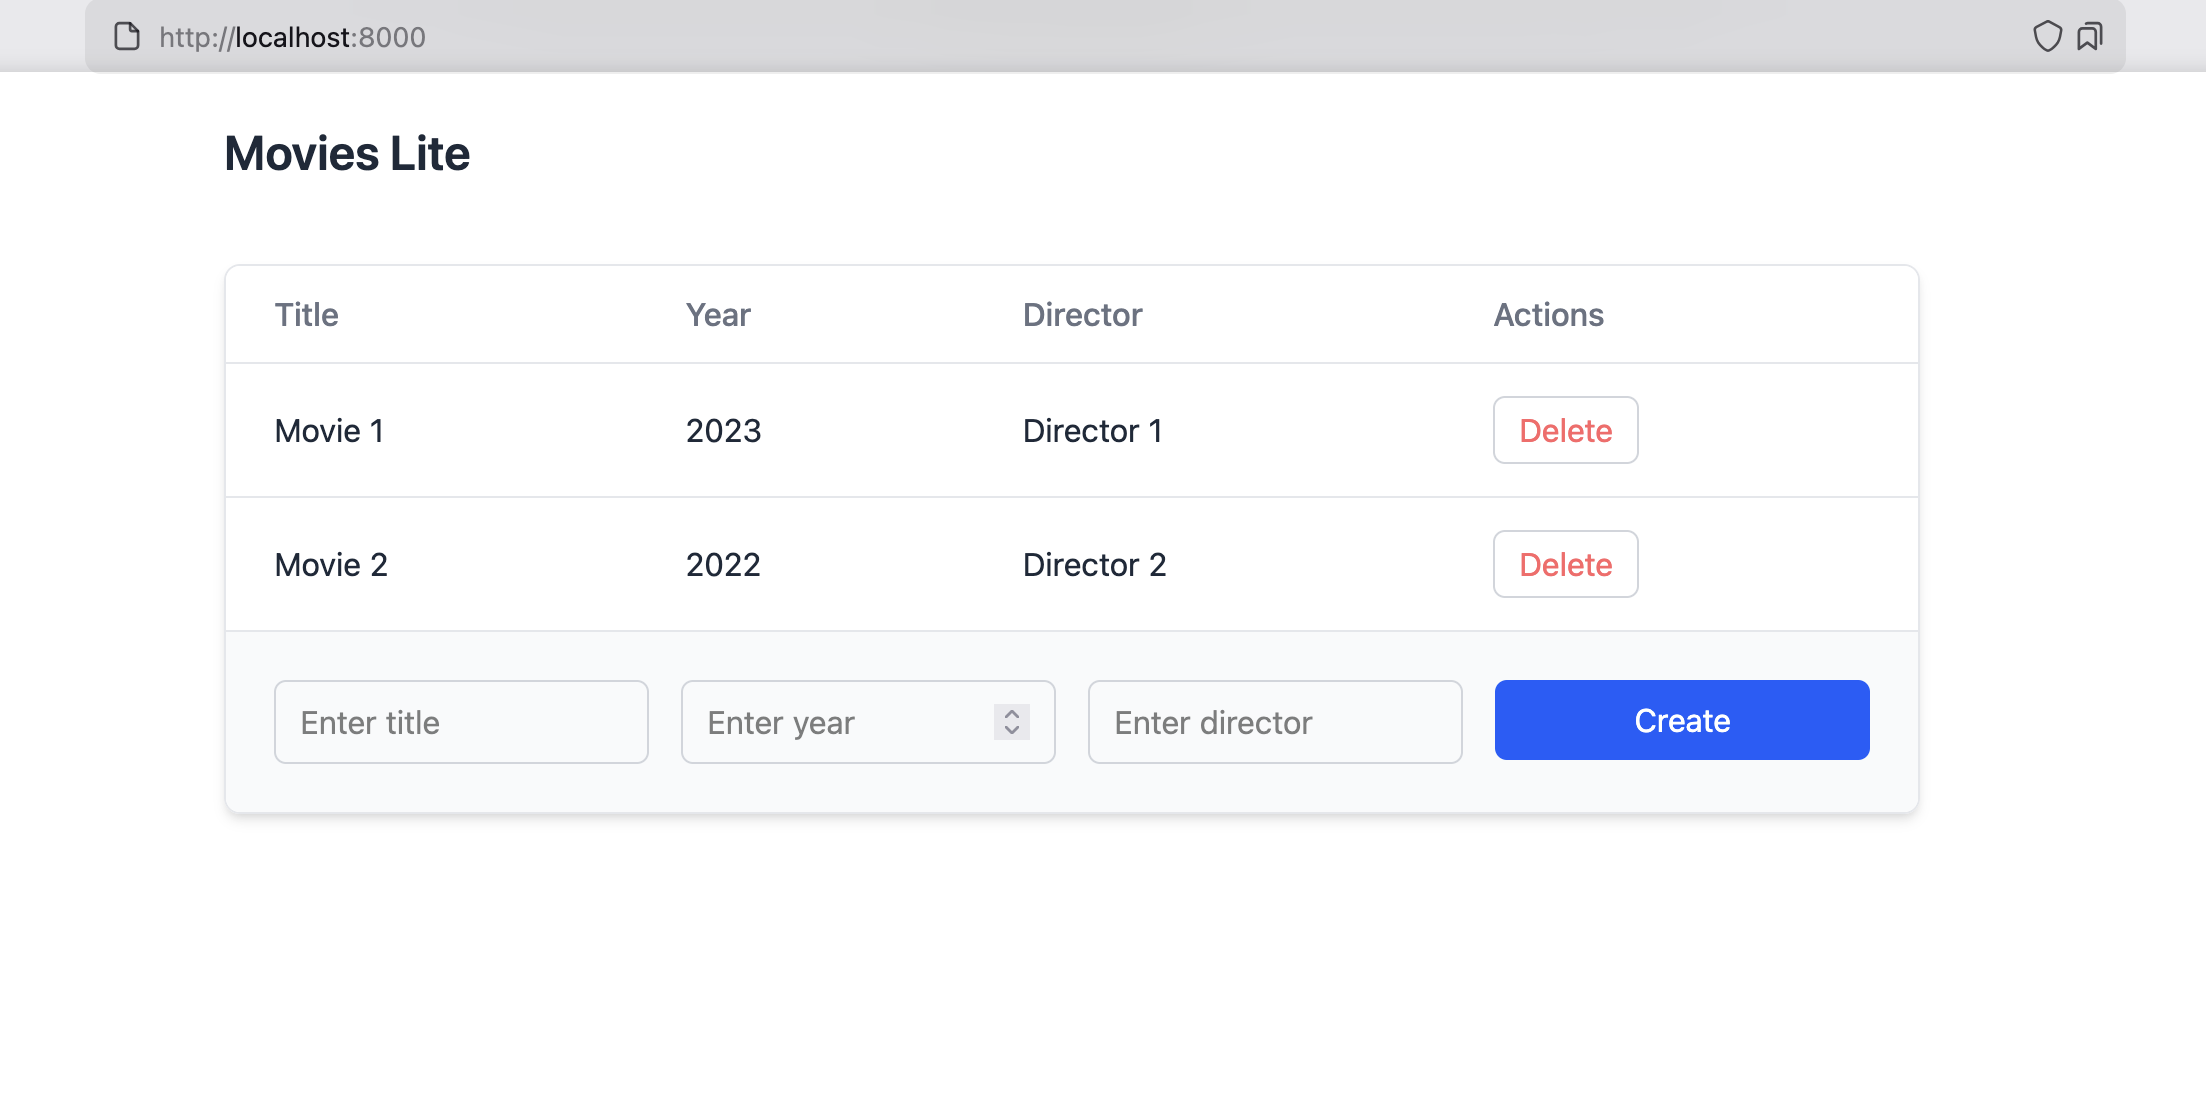
Now, let's update our home-handler to pass some sample data for movies to display on the page:

src/myproject/handlers.clj
; ...
(defn home-handler
  [_]
  (-> {:movies [{:title "Movie 1"
                 :year 2023
                 :director "Director 1"}
                {:title "Movie 2"
                 :year 2022
                 :director "Director 2"}]}
      (views/home-page)
      (reitit-extras/render-html)))

After running (reset) in the REPL and refreshing page in the browser it will look like:

Page layout

Creating Movies

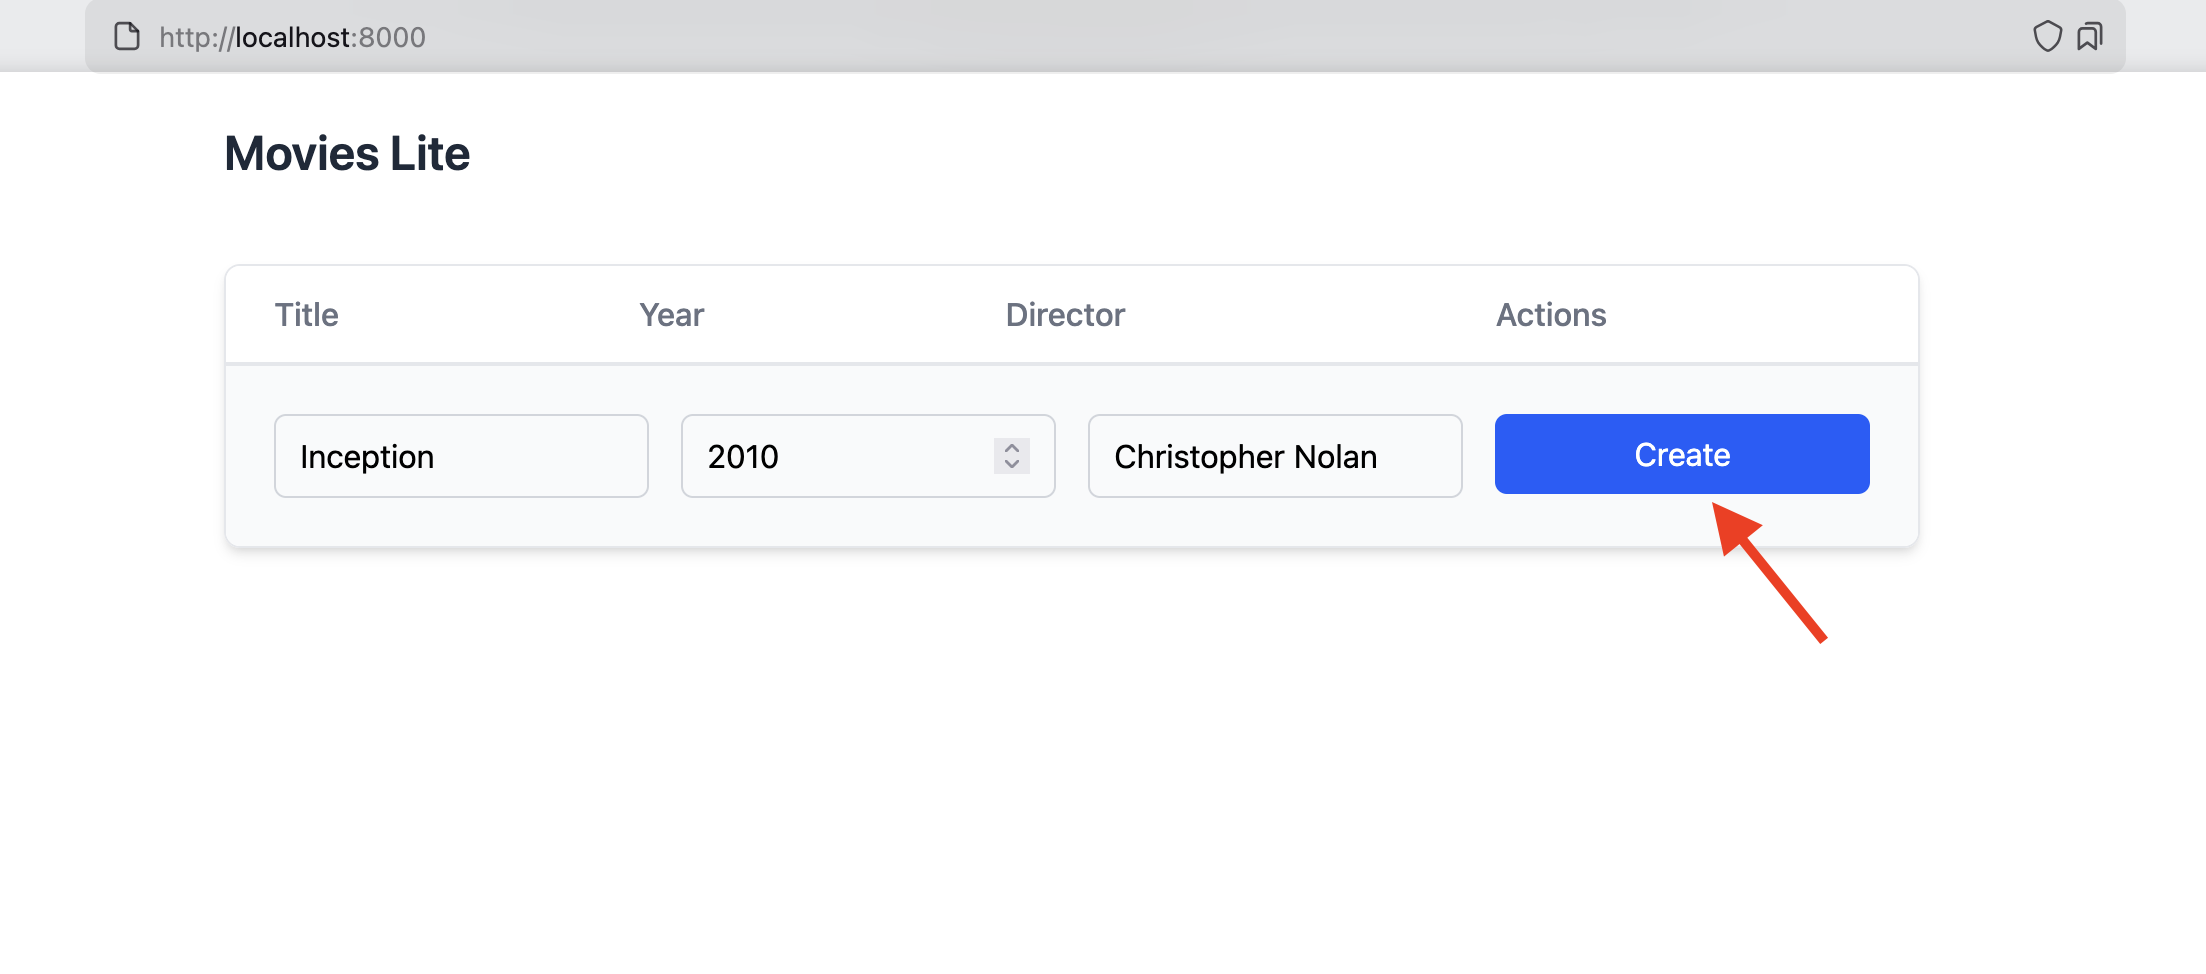
Now that we have the basic UI components for the table and form, let's implement the functionality to create new movies. This will involve adding database queries, creating a handler, and defining a route for our movie creation feature.

Backend Implementation

First, let's create the database queries needed for retrieving and creating movies. Create a new file src/myproject/queries.clj with the following content:

src/myproject/queries.clj
(ns myproject.queries
  (:require [myproject.db :as db]))
 
(defn get-movie-list
  [db]
  (db/exec! db {:select [:*]
                :from [:movie]
                :order-by [:id]}))
 
(defn create-movie
  [db {:keys [title year director]}]
  (db/exec-one! db {:insert-into :movie
                    :values [{:title title
                              :year year
                              :director director}]
                    :returning [:*]}))

These two functions handle our database operations:

  • get-movie-list retrieves all movies from the database, ordered by ID
  • create-movie inserts a new movie record and returns the created entry with all its fields

Next, we'll create a handler for processing movie creation requests:

src/myproject/handlers.clj
(ns myproject.handlers
  (:require [myproject.queries :as queries]
            ; ...
            )
 
; ...
 
(defn create-movie-handler
  "Render a new table item with newly created movie."
  [{router :reitit.core/router
    :keys [context params]}]
  (-> (list
        (views/form {:router router})
        [:template
         [:tbody
          {:hx-swap-oob "beforeend:#table-content"}
          (views/list-item {:router router
                            :movie (queries/create-movie (:db context) params)})]])
      (reitit-extras/render-html)
      (response/header "Content-Type" "text/html")))

Let's break down how this handler works:

  1. The handler receives a request map as its single parameter
  2. From this request, it extracts:
    • The router from :reitit.core/router
    • The application context and form params
  3. It then:
    • Creates a new movie in the database using queries/create-movie
    • Renders a fresh form and the newly created movie as a table row
    • Returns the HTML response with the appropriate content type

The :context key is automatically added to the request by the wrap-context middleware. This context contains all system components, including our database connection pool.

The response uses HTMX's out-of-band swap feature to add the new movie row to the end of our table without refreshing the entire page. The hx-swap-oob attribute targets the table body with the ID table-content that we defined earlier.

Now, let's define a route for this handler in our routes configuration:

src/myproject/routes.clj
; ...
 
(def routes
  [["/" {:name ::home-page
            :get {:handler handlers/home-handler}
            :responses {200 {:body string?}}}]
   ;...
   ["/movies"
    ["" {:name ::movie-list
         :post {:handler handlers/create-movie-handler
                :responses {200 {:body string?}}}}]]])

We're intentionally not adding a schema for request parameters in the route definition. Instead, we'll validate parameters directly in the handler (in a later section). This approach gives us more flexibility to return validation errors as part of the HTML response.

We retrieve parameters from the params key of the request, which is provided by the wrap-nested-params middleware, rather than using the parameters-middleware.

Finally, we need to update our home page handler to fetch movies from the database instead of using static data:

src/myproject/handlers.clj
;...
(defn home-handler
  [{:keys [context]
    router :reitit.core/router}]
  (-> {:router router
       :movies (queries/get-movie-list (:db context))}
      (views/home-page)
      (reitit-extras/render-html)))
;...

Frontend Implementation

With our backend ready, let's update the frontend to connect our form to the new route. We'll modify the form to send data to our backend and handle the response appropriately.

src/myproject/views.clj
(ns myproject.views
  (:require ; ...
            [reitit-extras.core :as reitit-extras]
            [myproject.routes :as-alias routes]))
 
;...
 
(defn form-input
  [{:keys [field-name field-type field-value attrs]}]
  [:div
   {:class ["flex" "flex-col"]}
   [:input (merge {:class ["w-full" "border" "border-gray-300" "rounded-md" "px-3" "py-2"]
                   :type field-type
                   :name field-name
                   :value (or field-value "")
                   :placeholder (str "Enter " field-name)}
                  attrs)]])
 
(defn form
  [{:keys [router params]}]
  [:form
   {:id "form-create-movie"
    :class ["border-t" "border-gray-200" "bg-gray-50" "p-6"]
    :hx-post (reitit-extras/get-route router ::routes/movie-list)
    :hx-target "#form-create-movie"
    :hx-swap "outerHTML"}
   (reitit-extras/csrf-token-html)
   [:div {:class ["grid" "grid-cols-1" "md:grid-cols-4" "gap-4"]}
       (form-input {:field-name "title"
                    :field-type "text"
                    :field-value (:title params)})
       (form-input {:field-name "year"
                    :field-type "number"
                    :field-value (:year params)
                    :attrs {:min 1888}})
       (form-input {:field-name "director"
                    :field-type "text"
                    :field-value (:director params)})
   ;...
   ])
 
(defn home-page
  [{:keys [movies router]}]
  (base
    [:div {:id "content"
           :class ["container" "mx-auto" "p-6" "max-w-4xl"]}
     [:div {:class ["mb-10" "flex" "justify-between" "items-center"]}
      [:h1 {:class ["text-2xl" "font-semibold" "text-gray-800"]} "Movies Lite"]]
     [:div {:class ["bg-white" "rounded-lg" "shadow-md" "overflow-hidden" "border"
                    "border-gray-200"]}
      ; ...
      (form {:router router})]]))

Let's examine the key changes we've made to connect our frontend with the backend:

  1. Required imports:

    • We import reitit-extras.core for route generation and CSRF protection
    • We import myproject.routes as an alias to reference our route names
  2. Form component enhancements:

    • We've updated the form-input function to accept and display field values
    • The form component now accepts router and params as arguments
  3. HTMX integration:

    • :hx-post - Specifies the endpoint for form submission using the router to generate the correct URL
    • :hx-target - Targets the form itself for replacement
    • :hx-swap - Replaces the entire form with the response content
    • (reitit-extras/csrf-token-html) - A CSRF token for secure form submissions
  4. Home page updates:

    • The home-page function now accepts both movies and router parameters
    • It passes the router to the form component to enable proper URL generation

When a user submits the form, HTMX will send a POST request to our backend. The handler will process the request, create a new movie, and return HTML that includes:

  1. A fresh form (replacing the current one)
  2. A new table row with the movie data (added to the table via the out-of-band swap)

Now, after reloading the system in the REPL with (reset), we should be able to create new movies using our form:

Create movie 1

Create movie 2

Form Validation

Our form can create a movie, but what happens if a user doesn't fill in required fields? Without validation, we'd store empty values to the database. Let's implement proper validation to provide a better user experience.

We'll add parameter validation before inserting data into the database and display user-friendly error messages on the page.

Typically, we would define parameter validation as part of the router using Malli schemas. However, to return custom HTML with validation messages directly in the form, we'll implement validation in the handler instead.

src/myproject/handlers.clj
(ns myproject.handlers
  (:require [malli.core :as m]
            [malli.error :as me]
            [malli.transform :as mt]
            [myproject.queries :as queries]
            [myproject.views :as views]
            [reitit-extras.core :as reitit-extras]
            [ring.util.response :as response]))
 
(defn validate-params!
  "Validate router parameters and return human-readable errors."
  [schema data]
  (try
    (m/coerce schema data (mt/transformer mt/strip-extra-keys-transformer
                                          mt/string-transformer))
    (catch Exception e
      {:errors (-> e (ex-data) :data :explain me/humanize)})))
 
 
(defn create-movie-handler
  "Render a new table item with newly created movie or return validation errors."
  [{router :reitit.core/router
    :keys [context params]}]
  (let [validated-params (validate-params! [:map
                                            [:title [:string {:min 1}]]
                                            [:year pos-int?]
                                            [:director [:string {:min 1}]]]
                                           params)]
    (if (seq (:errors validated-params))
      (-> {:router router
           :errors (:errors validated-params)
           :params params}
          (views/form)
          (reitit-extras/render-html))
      (-> (list
            (views/form {:router router})
            [:template
             [:tbody
              {:hx-swap-oob "beforeend:#table-content"}
              (views/list-item {:router router
                                :movie (queries/create-movie (:db context) params)})]])
          (reitit-extras/render-html)
          (response/header "Content-Type" "text/html")))))

Now let's update our frontend components to display validation errors. We'll modify both the form-input and form components to handle and display error messages.

src/myproject/views.clj
; ...
 
(defn form-input
  [{:keys [field-name field-type field-value errors attrs]}]
  [:div
   ; ...
   (for [err errors]
     [:p {:class ["text-red-500" "text-xs" "mt-1" "h-4"]} err])])
 
(defn form
  [{:keys [router errors params]}]
  [:form
   {:id "form-create-movie"
    :class ["border-t" "border-gray-200" "bg-gray-50" "p-6"]
    :hx-post (reitit-extras/get-route router ::routes/movie-list)
    :hx-target "#form-create-movie"
    :hx-swap "outerHTML"}
   (reitit-extras/csrf-token-html)
   [:div {:class ["grid" "grid-cols-1" "md:grid-cols-4" "gap-4"]}
    (form-input {:field-name "title"
                 :field-type "text"
                 :field-value (:title params)
                 :errors (:title errors)})
    (form-input {:field-name "year"
                 :field-type "number"
                 :field-value (:year params)
                 :errors (:year errors)
                 :attrs {:min 1888}})
    (form-input {:field-name "director"
                 :field-type "text"
                 :field-value (:director params)
                 :errors (:director errors)})
    [:div {:class ["flex" "flex-col"]}
     [:button {:class ["bg-blue-600" "text-white" "rounded-md" "px-4" "py-2"
                       "hover:bg-blue-700" "cursor-pointer"]}
      "Create"]]]])

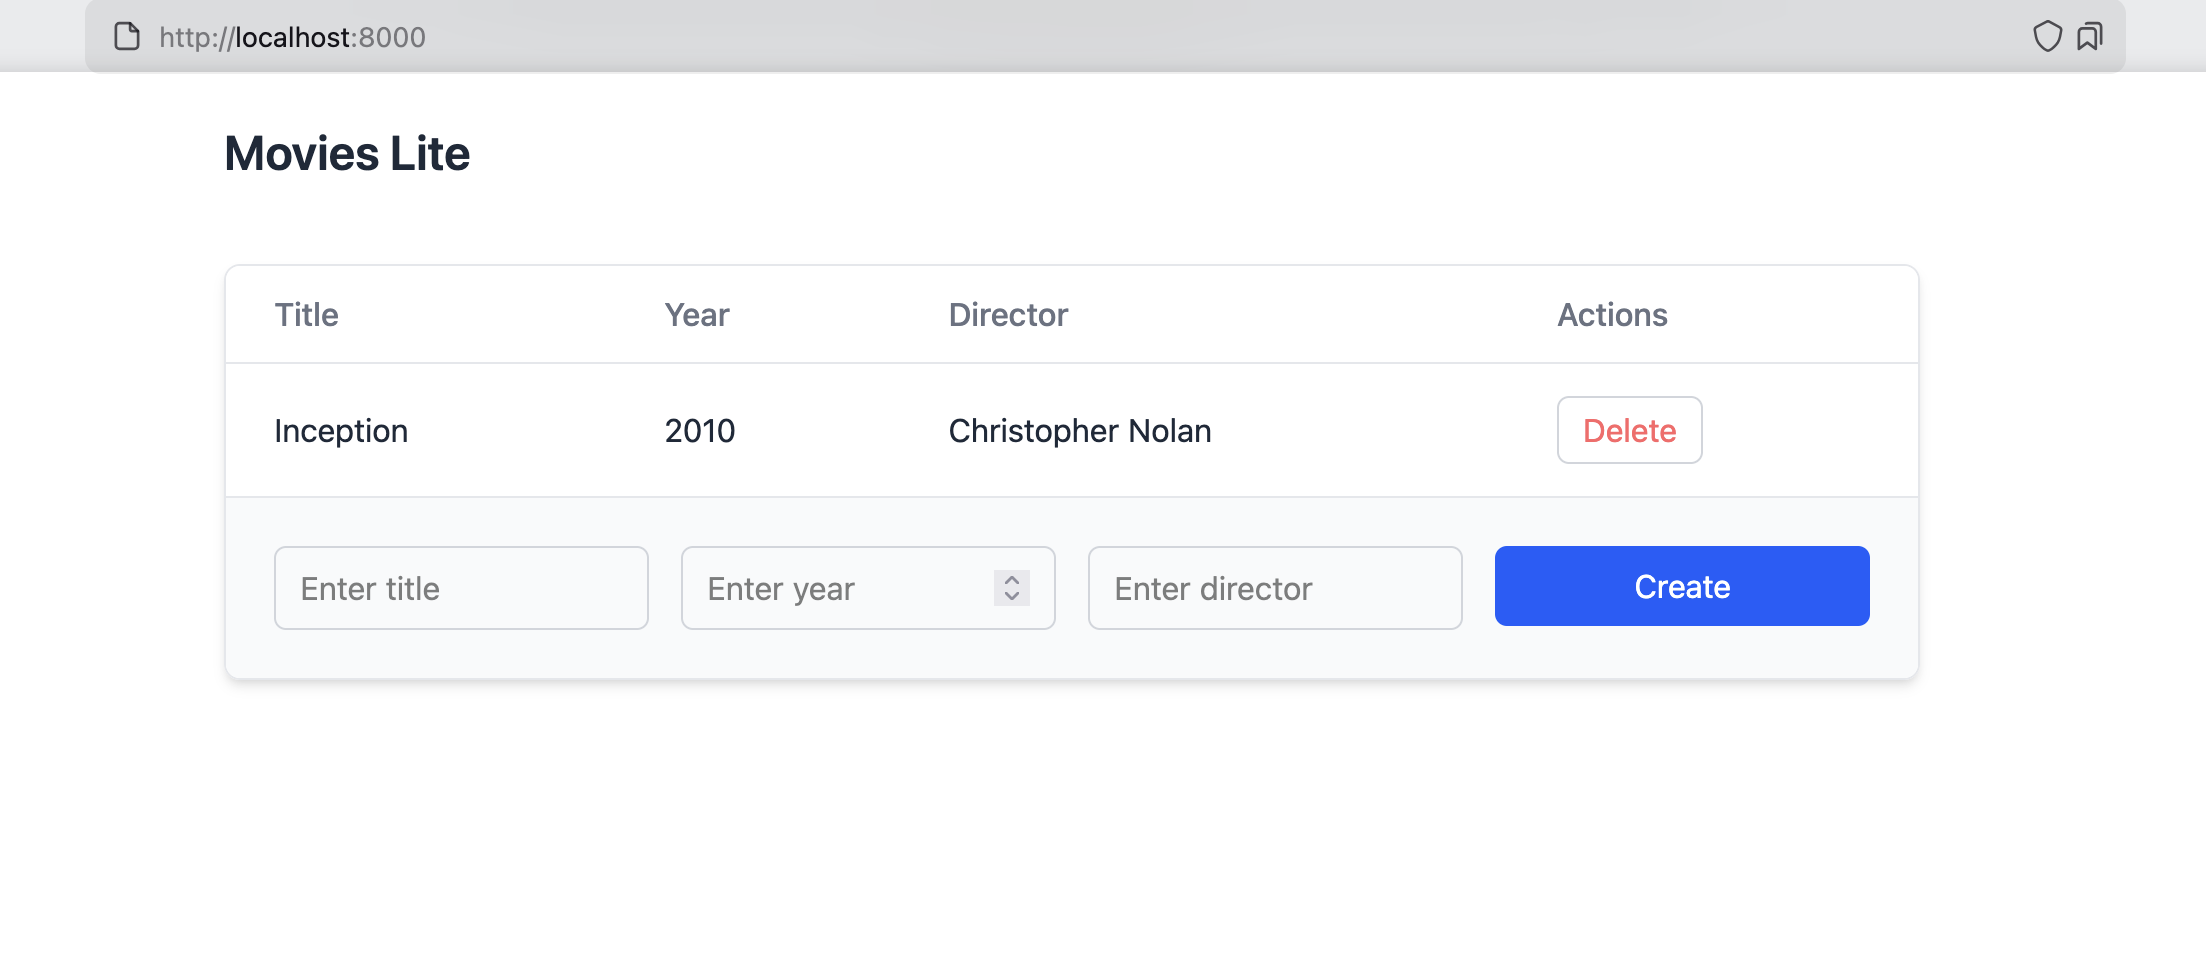
After resetting the system in the REPL with (reset) and refreshing the page, we can test our validation by submitting the form with empty fields. The system will display appropriate error messages for each invalid field:

Create form validation errors

How the Validation Flow Works

  1. User submits the form -> HTMX sends a POST request to our endpoint
  2. Server validates the input:
    • If invalid -> Returns the form with error messages
    • If valid -> Creates the movie and returns updated HTML
  3. HTMX updates the DOM:
    • Replaces the form with the response
    • Adds the new movie row to the table (if validation passed)

This approach provides immediate feedback to users without page refreshes, creating a smooth experience while maintaining the simplicity of Server-side Rendering.

Delete a Movie

To delete a movie, let's add a query, handler, and route for it.

src/myproject/queries.clj
;...
(defn delete-movie
  [db {:keys [id]}]
  (db/exec-one! db {:delete-from :movie
                    :where [:= :id id]
                    :returning [:*]}))
src/myproject/handlers.clj
; ...
(defn delete-movie-handler
  [{:keys [context parameters]}]
  (queries/delete-movie (:db context) {:id (get-in parameters [:path :id])})
  (response/response nil))

The route we will add as a su-route for existing /movies route, and it will look like this:

src/myproject/routes.clj
;...
(def routes
  [; ...
   ["/movies"
    ["" {:name ::movie-list
         :post {:handler handlers/create-movie-handler
                :responses {200 {:body string?}}}}]
    ["/:id"
     ["" {:name ::movie-details
          :delete {:handler handlers/delete-movie-handler
                   :parameters {:path {:id pos-int?}}}}]]]])

Now we can add a delete button to each row of the table. We'll use the :hx-delete attribute to send a request to the server. We'll add "closest tr" as :hx-target to remove the row from the table. We also need to add a CSRF token to the request header.

src/myproject/views.clj
; ...
 
(defn list-item
  [{:keys [router movie]}]
  [:tr
   [:td {:class ["px-6" "py-4" "text-gray-800"]} (:title movie)]
   [:td {:class ["px-6" "py-4" "text-gray-800"]} (:year movie)]
   [:td {:class ["px-6" "py-4" "text-gray-800"]} (:director movie)]
   [:td {:class ["px-6" "py-4"]}
    [:button
     {:class ["text-red-400" "hover:bg-gray-50" "bg-white" "border"
              "border-gray-300" "rounded-md" "px-3" "py-1" "cursor-pointer"]
      :hx-delete (reitit-extras/get-route router ::routes/movie-details {:path {:id (:id movie)}})
      :hx-headers (reitit-extras/csrf-token-json)
      :hx-target "closest tr"
      :hx-swap "outerHTML"}
     "Delete"]]])
 
;...
 
(defn home-page
  [{:keys [router movies]}]
  (base
    [:div {:id "content"
           :class ["container" "mx-auto" "p-6" "max-w-4xl"]}
     ; ...
     [:div {:class ["bg-white" "rounded-lg" "shadow-md" "overflow-hidden" "border" "border-gray-200"]}
      [:div {:class ["overflow-x-auto"]}
       [:table {:class ["min-w-full" "divide-y" "divide-gray-200"]}
        ; ...
        [:tbody {:id "table-content"
                 :class ["bg-white" "divide-y" "divide-gray-200"]}
         (for [movie movies]
           (list-item {:router router
                       :movie movie}))]]]
      (form {:router router})]]))

After refreshing the system in REPL with (reset), we can remove the row from the table by clicking on the delete button.

Testing

We have a simple application that we can test. Let's start with fixing the existing test:

test/myproject/home_test.clj
; ...
 
(deftest test-home-page-is-loaded-correctly
  (let [server (::server/server ig-extras/*test-system*)
        url (reitit-extras/get-server-url server :host)
        body (-> (hato/get url)
                 :body
                 (hickory/parse)
                 (hickory/as-hickory))]
    (is (= "Movies Lite"
           (->> body
                (select/select (select/tag :h1))
                (first)
                :content
                (first))))))

Now if you run bb test, it should pass:

$ bb test
Running task: test
Loading namespaces:  (myproject.db myproject.queries myproject.views myproject.handlers myproject.routes myproject.core myproject.server)
Test namespaces:  (myproject.home-test myproject.test-utils)
Instrumented myproject.db
Instrumented myproject.queries
Instrumented myproject.views
Instrumented myproject.handlers
Instrumented myproject.routes
Instrumented myproject.core
Instrumented myproject.server
Instrumented 7 namespaces in 3.2 seconds.
 
1/1   100% [==================================================]  ETA: 00:00
 
Ran 1 tests in 0.643 seconds
1 assertion, 0 failures, 0 errors.
Ran tests.
 
|--------------------+---------+---------|
|          Namespace | % Forms | % Lines |
|--------------------+---------+---------|
|     myproject.core |   22.22 |   66.67 |
|       myproject.db |   89.22 |   91.30 |
| myproject.handlers |   14.49 |   27.50 |
|  myproject.queries |   34.69 |   46.67 |
|   myproject.routes |   95.31 |  100.00 |
|   myproject.server |  100.00 |  100.00 |
|    myproject.views |   73.87 |   82.22 |
|--------------------+---------+---------|
|          ALL FILES |   69.68 |   73.71 |
|--------------------+---------+---------|

Testing list of movies

We can update this test to check if we can show a movie on a page:

test/myproject/home_test.clj
(ns myproject.home-test
  (:require ; ...
            [myproject.db :as db]
            [myproject.queries :as queries]
            [myproject.server :as-alias server]
            ;...
            ))
 
(deftest test-home-page-is-loaded-correctly
  (let [server (::server/server ig-extras/*test-system*)
        db (::db/db ig-extras/*test-system*)
        url (reitit-extras/get-server-url server :host)
        _ (queries/create-movie db {:title "The Matrix"
                                    :year 1999
                                    :director "Lana Wachowski, Lilly Wachowski"})
        body (-> (http/get url)
                 :body
                 (hickory/parse)
                 (hickory/as-hickory))]
    (is (= "Movies Lite"
           (->> body
                (select/select (select/tag :h1))
                (first)
                :content
                (first))))
    (is (= ["The Matrix" "1999" "Lana Wachowski, Lilly Wachowski"]
           (->> body
                (select/select (select/tag :td))
                (map (comp first :content))
                (butlast))))))

If you run bb test, it should pass.

Testing movie creation

Now we can add a test for creating a movie:

test/myproject/home_test.clj
(deftest test-create-movie-ok
  (let [server (::server/server ig-extras/*test-system*)
        db (::db/db ig-extras/*test-system*)
        base-url (reitit-extras/get-server-url server :host)
        url (str base-url "/movies")
        {:keys [csrf-token cookies]} (test-utils/get-csrf-token-and-cookies base-url)]
    ; Create a new movie
    (http/post url {:cookies cookies
                    :form-params {test-utils/CSRF-TOKEN-KEY csrf-token
                                  :title "The Matrix"
                                  :year 1999
                                  :director "Lana Wachowski, Lilly Wachowski"}})
 
    (is (= [{:director "Lana Wachowski, Lilly Wachowski"
             :title "The Matrix"
             :year 1999}]
           (db/exec! db {:select [:title :year :director]
                         :from [:movie]})))))

Notice how we get the CSRF token from the page and add it to the request header using cookies.

And one for deleting a movie:

test/myproject/home_test.clj
(deftest test-delete-movie-ok
  (let [server (::server/server ig-extras/*test-system*)
        db (::db/db ig-extras/*test-system*)
        base-url (reitit-extras/get-server-url server :host)
        movie (queries/create-movie db {:title "The Matrix"
                                        :year 1999
                                        :director "Lana Wachowski, Lilly Wachowski"})
        url (str base-url "/movies/" (:id movie))
        {:keys [csrf-token cookies]} (test-utils/get-csrf-token-and-cookies base-url)]
    ; Delete the movie
    (http/delete url {:cookies cookies
                      :headers {test-utils/CSRF-TOKEN-HEADER csrf-token}})
 
    (is (= [] (db/exec! db {:select [:*]
                            :from [:movie]})))))

All tests should pass and this time the coverage should higher:

$ bb test
Running task: test
Loading namespaces:  (myproject.db myproject.queries myproject.views myproject.handlers myproject.routes myproject.core myproject.server)
Test namespaces:  (myproject.home-test myproject.test-utils)
Instrumented myproject.db
Instrumented myproject.queries
Instrumented myproject.views
Instrumented myproject.handlers
Instrumented myproject.routes
Instrumented myproject.core
Instrumented myproject.server
Instrumented 7 namespaces in 3.2 seconds.
 
3/3   100% [==================================================]  ETA: 00:00
 
Ran 3 tests in 0.649 seconds
4 assertions, 0 failures, 0 errors.
Ran tests.
Writing HTML report to: /Users/andrew/Projects/TRASH/DEMO2/myproject/target/coverage/index.html
 
|--------------------+---------+---------|
|          Namespace | % Forms | % Lines |
|--------------------+---------+---------|
|     myproject.core |   22.22 |   66.67 |
|       myproject.db |  100.00 |  100.00 |
| myproject.handlers |   76.81 |   77.50 |
|  myproject.queries |  100.00 |  100.00 |
|   myproject.routes |   95.31 |  100.00 |
|   myproject.server |  100.00 |  100.00 |
|    myproject.views |   91.47 |   94.44 |
|--------------------+---------+---------|
|          ALL FILES |   91.43 |   92.96 |
|--------------------+---------+---------|

Check linting and formatting

After some changes, we can check if everything is still ok with our code:

bb check

If there are some formatting changes we can commit them.

Summary

In this quick tutorial, we created a simple application with Clojure Stack Lite. We've seen how to create a new project, start the server, and build a simple application with a form and a table. We performed POST, GET, and DELETE requests using HTMX, with form validation and error handling.

For real-world applications, you might want to add more features like user registration and authentication, list pagination, etc. This tutorial provides a basic foundation to build your own application.

Next steps

From here, you can proceed with deploying your application to production or learn more about project structure and management in the "Guide" section.